
Electrical switches come in different types and configurations with their unique setup. One of the basic and simple switches is the toggle switch, which brings straightforward on-and-off functionality.
You can make the right connections and operate the switch with the proper setup and wiring. Today, we will learn about the toggle switches and their configurations with their easy setup.
Let’s explore wiring steps.
What is a Toggle Switch? How Does It Work?
A toggle switch is straightforward with a simple on and off mechanism. It can either turn on the switch and let the electricity flow. Sometimes, it can turn off the switch and cut off the supply. Because of plug-and-play functionality, such a switch is very effective in cars, electronics, appliances, and lighting systems.

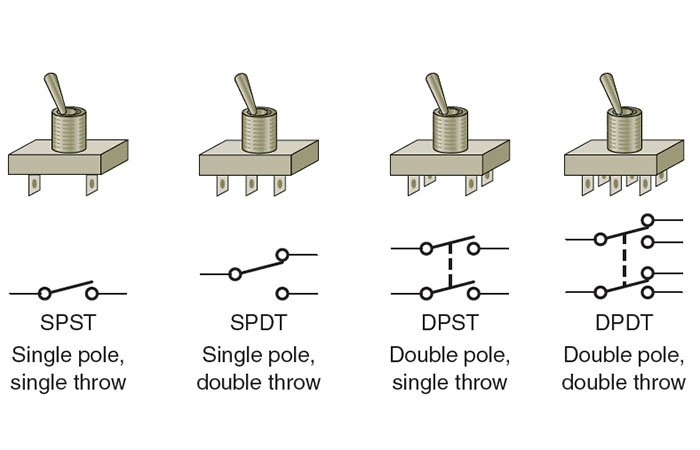
Types of a Toggle Switch
There are often four configurations of the toggle switch.
Single-pole single-throw (SPST)
A single-pole and single-throw switch is a simple on-and-off toggle switch. It controls only one circuit with a single way of current flow and turns the system on and off when toggled.
Single-pole double-throw (SPDT)
Consider it like a selector switch. You have an added functionality with a three-pin system with on, off, and on configurations. A standard input system has two outputs connected to the load to turn it on and off.
Double pole single throw (DPST)
A double-pole single-throw switch is the most crucial configuration to control two circuits or lights with a single switch. It is like two SPST switches with four pins, including two inputs and two outputs. Flipping the switch can turn on or off two different devices.
Double pole double throw (DPDT)
A double-pole and double-throw switch combines the features of two single-pole double-throw switches. With six pins, it has two inputs and four outputs for the two switches. It controls two circuits while each switch has two outputs.
Tools and Materials Required to Wire a Toggle Switch
There is a list of tools and necessary materials to accomplish the wiring task. You should have the following tools:
- Toggle switch
- Wire strippers
- Screwdriver
- Electrical tape
- Wires
- Wire connectors
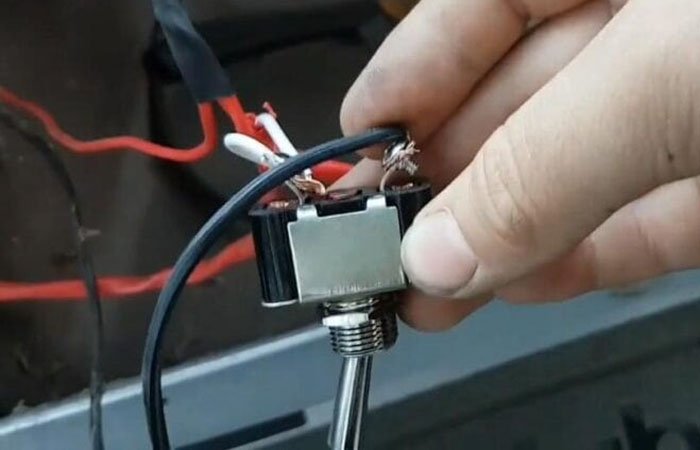
Step-by-step Guide To Wire A Toggle Switch
Here are a few steps to wire a toggle switch if you have gathered all the tools.
Step 1: Find Switch Pins
How many pins does your switch have? There are often two integrations.
Two pin switch is a basic system with a simple on and off facility. While a three pin switch comes with an on, off, and on functionality of the switch.
Step 2: Prepare Wires
Find the ends of the wires and remove the insulation with the wire stripper. Usually, a ½ inch insulation removal is sufficient to build the impactful connections between the ends.
Step 3: Connect Wires
Which type of configuration you use matters a lot. For example, a two-pin switch offers basic functionality. That means you can connect the positive terminal to one end of the wire and the negative to the other. Usually, it doesn’t matter which terminal you connect to, whether positive or negative.
In a three-terminal switch, the middle pin is often the common, while an outer terminal connects to the load you want to control. You should connect the third pin to keep the on-off-on configuration of the switch.
Step 4: Secure Connections
Once you are done connecting the terminals, check the connections. Locate any loose connections and tighten them to ensure a secure connection. You can use the screwdriver in this case.
Step 5: Insulate Connections
Grab the electrical tape and wrap it around all the exposed connections and metals well.
Step 6: Mount and Test the switch
You might have an electrical box to mount the switch. Whatever your desired location, set the switch and turn the power on. Test the connections and check for errors or short circuits with a thorough checkup.
Safety Precautions to Avoid Accidents on Toggle Switch
Mishaps can happen during the connection of a toggle switch. You should follow the safety codes and precautions:
Power off
Don’t keep the power on when you are wiring the switch. It is because of fire and human injury risks due to the current flow. Unplug a device, disconnect a battery, or switch off the main breaker to avoid electric shocks.
Use Insulated Tools
One of the major reasons for electrical shocks is the non-insulated tools. They can catch the electrical currents and cause electrical burns. So, you should use the insulated tools and also wrap the electrical tape at the exposed joints and wires.
Comply with Local Electrical Codes
Every region has a few electrical codes that ensure the safety of the electrical works. All you have to do is to read through those electrical codes and learn about precautions. Follow them effectively.
FAQs
1. Does it matter which wire goes where on a toggle switch?
It depends mainly on the configuration. For example, a two pin configuration doesn’t require you to identify positive or negative terminals. However, a three configuration has the middle pin as the common input while the two outer pins are output.
2. How do you tell positive and negative things on a toggle switch?
Because of straightforward functionality, most switches don’t come with positive or negative terminals. Depending on the switch type, they can be labelled as the common or load.
3. What happens if we connect the wrong terminals on a toggle switch?
Your toggle switch won’t work exactly. If it does, short circuiting and electrical accidents may happen due to wrong connections.
4. Is it essential to ground a toggle switch?
There is no necessary condition for grounding the toggle switch. However, you might have to ground it when installed in the house to improve safety.
Conclusion
A toggle switch doesn’t require you to have in-depth knowledge. Only a basic understanding is sufficient to connect the wires. Double-check the connections and test the functionality to understand whether the switch works. Insulate and secure all the cables effectively.